Showing posts with label bo bunny. Show all posts

Thursday, August 26, 2021

Slimline Card Sketch

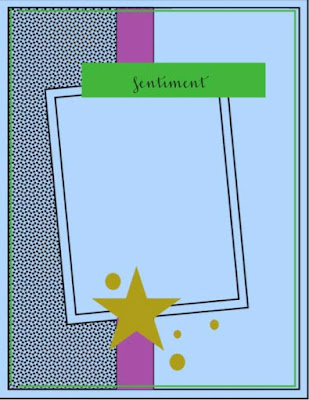
    This month over at Stick It Down blog features a trendy slimline card sketch that can be used for any size card. 

   Here is my take on the card. It is fun to make and I was able to play with my distress ink and stencils on it. 
Supplies: cardstock (Cardstock Warehouse), pattern paper (Bo Bunny), manual die (Crafter's Companion), stickers (Studio Calico), ink (Ranger), stencil (Prima), and washi tape (Scotch)

   To make the sentiment pop I did a layer die-cut in black glitter cardstock and a gunmetal mirror paper. 


Play along at Stick It Down You have until the end of the month to play along with any - or all! - of our sketch challenges. Just post a link to your creation in the sidebar. If you share on social media, be sure to tag #StickItDown. 
We'll choose one winner from each sketch to be a guest designer!

Monday, September 14, 2020

Anniversary Card - SID

   This month's card sketch from Stick It Down is a fun one that can allow you to do some fun elements. 
   Here is my take on the sketch. I created this elegant "love" card for my parents' 40th anniversary. I used a lot of red since I went with the traditional "ruby" theme anniversary. 
Supplies: cardstock (Cardstock Warehouse), pattern paper (Bo Bunny), washi tape (Scotch Brand), manual die (Paper Smooches), sequins (Treehouse Studio), dew drops (The Robin's Nest), embossing folder (The Paper Studio), tools (We R Memory Keepers, and Spellbinders), other (foam tape and plastic)
   The fun element that I did on this card was doing a shaker filled with dew drops and sequins. 


   Be sure to play along. You have until the end of the month to play along with any - or all! - of our sketch challenges. Just post a link to your creation in our sidebar. If you share on social media, be sure to tag #StickItDown. 

One randomly selected winner will receive a prize! We'll also choose one winner from each sketch to be a guest designer!


Friday, June 12, 2020

DRU Box Card How-To

Today, I will be sharing with you how to create a box card that is 3-D folds flat when it is time to mail. 
   I have created diagrams to help with the instructions. 

Your card should look like this. 
   With the 1" strips that you previously cut from the cardstock, trim it down to 4 1/2" with a 1" score line on each end. Glue to the inside of the box. For my example, I did it in a different color so you can see how it should look. 
   With the Frantic Stamper's Strolling Monique I created a layer die cut. Die cut in two different papers and trim the portion you want, here the shoes and dress. I then glued it to the base die cut. The finishing touch to her was coloring the hair with an alcohol marker. 
   To decorate the card base use six 2 1/4" x 2 1/4", three 2 1/4" x  3 3/4", and two 2 1/4" x 6 1/4". Here is the finished card. The Impression Obsession Birthday die in the front. 
Dies R Us Product Used:


Don't forget to come to join in the fun at the Dies R Us Challenge Blog.  There's a new challenge theme offered on the 1st and 15th of each month and one lucky randomly drawn winner will receive a gift voucher prize to the Dies R Us Store.  For your convenience, all the important Dies R Us links are provided below.


Click below for:
FRIENDS OF DIES R US PINTEREST PAGE

Thanks for stopping by!

Friday, January 8, 2016

Seating for 4 - SBC #FBF

   After many distractions, one being of Buster staring at me with one eye while laying in his bed, and errands I finally am getting this post posted. Today's post is the first remake sketch of the year for Scrapbook Challenges
   This is the original. 
   Here is the update. 
   I loved this sketch because I was able to change the amount of photos easily but the sketch is easily can be seen in the finish product.  First off I have to say I am in love with the printer I got for Christmas. I just love the quality of this print I did.
Supplies: cardstock (The paper Studio), patter paper (Heidi Swapp and Canvas Corp. Brand), border punch (EK Success), doily (Studio Calico), stickers (American Crafts and Studio Calico), wood veneer (Target), electronic die cutter, software and cartridge (Cricut), sewing machine and black thread.

   Here is a little tip on wood veneers, buy those cute little gift toppers or ornaments you can find at Target. I bought a package of 6 of these snowflake for only $0.50.  These would have easily been  a lot more if you found them at a craft store. 
   Here is a close up on the title work. After I did this page I realized I used the same title for 2014 Thanksgiving page or Christmas.

Friday, December 11, 2015

Santa & Me - SBC #FBF

   It is time for another Flashback Friday sketch. This week at Scrapbook Challenges we updated sketch #279


   I entitled this layout Santa & Me (while not me as in myself but my mom), I found the photos in  cute little cards that came with the photos and the front's said Santa & Me. 
Supplies: cardstock (The Paper Studio), pattern paper (Heidi Swapp and Studio Calico card kit paper pad), washi tape (American Crafts and Studio Calico), chipboard (Bo Bunny), stickers (American crafts), twine (Timeless Twine), doily (Doodlebug Design), stitching template (American Crafts), border punch (EK Success), pen (Project Life)

   Here are some close-ups since it is hard to see a double page spread online. 


   Don't you just love that look on my mom's face in that last photo on the right.


Monday, August 17, 2015

Family, Friends & Fun - SBC #452


   Here is my take on today's reveal. 
Supplies: cardstock (The Paper Studio), pattern paper (Cosmo Cricket), stickers (Fancy Pants Designs and American Crafts), die cuts (Studio Calico kit exclusive), chipboard (Bo Bunny), labels (Elle's Studio and Chic Tags), wood veneer (?),  resin ( The Paper Studio)twine (Timeless Twine), embroidery floss (DMC), washi tape (Scotch Brand). mask (Studio Calico), modeling paste (Liquitex), mist (Tattered Angels), embroidery template (American Crafts)  and diy enamel dots)

Here is a close-up look of the title work. I love the mixing of textures and fonts. It adds so much more interest and draws the eye in. 

   The pics on this page were back from the 60's of my mom, her brother and their friends enjoying the summer at the beach in Grand Haven.


Monday, April 13, 2015

A Relaxing Lake Floater - SBC #435

   It is Monday morning and that means it is time for a Scrapbook Challenges latest sketch reveal #435
   
   For this page I changed the number of photos that were used in the sketch. Since my photos were bigger than 3" I just removed one of them.
 Supplies: cardstock (The Paper Studio), pattern paper (Crate Paper and American Crafts), washi tape (My Mind's Eye and Scotch Brand), chipboard (Bo Bunny), stickers (American Crafts, My Mind;s Eye and Simple Stories), twine (Timeless Twine), stitching templates (American Crafts). sequins (Hazel & Ruby), stamp (Deep Red Stamps), ink (Close to My Heart) and electronic die cutter, cartridge and software (Provo Craft) 

  Here is my favorite title technique. I love mixing fonts and textures in my titles. Here I have twine, foam and paper. 
    I added sequins to the front if each  journaling strip to create a bullet point. Plus, it adds a nice sparkle. I also added more of the twine stitching.

Saturday, December 27, 2014

Dec. Daily

This year, I decided to do another album to document the days leading up to Christmas. Even though I never completed last year I still wanted to do it. This year was very low so it was easy to keep up-to-date. I didn't have any design team projects, home decor projects, or really any handmade gifts to make (just a sweater I knitted for Buster, two dog toys, a scarf and cocoa mixes). Plus, feeling not like Christmas here made for the less work I would have like doing. 

   Anyway, I thought it would be nice to share a little peek at my Dec. Daily album. I took a Sn@p album from Simple Stories and decorated it. 
I ended up using products from a lot of different holiday collections that I only had scraps of. Now,I am almost out of all holiday embellishments and I did use up a lot of paper scraps.
 I also add a CD case to my Dec. Daily albums so it can hold a disc that I burn with all of the dec. photos and videos.
 The spread is of the first 2 days of Dec. Our tree top broke on day one.
 This is days three and four. I started Buster's sweater on day three and wrapped gifts on day four
 Day nine I made my favorite Christmas cookie, Gingerbread. Those went by so fast this year tha I had to make two batches.
 The 21st I rewrapped a gift (long story on that), and decorated the table.
I am happy to say this year album's will be done shortly. I just have to finish the 24th and 25 pages. I already have the photos edited.
I am linking this up to S.W.A.T. extra winter fun challenge

Monday, December 15, 2014

The Pretty Lights- Child's Play Challenges

This is the last Child's Play layout I will be posting. Child's Play Challenges has decided to shut it's doors. For this last challenge the theme has to do with a great classic kid's toy I wished for. 

   Lite Brite made me think of Christmas lights so I scraped some poor quality photos from a couple of years ago. 
Supplies: cardstock (The Paper Studio), pattern paper (American Crafts, Studio Calico and Basic Grey), tags (Bo Bunny, Pink Paislee, and Jolee's), doily (Sunny-side Bakery, The Paper Studio and Doodlebug Design)), stickers (My Mind's Eye, American Crafts and October Afternoon), journaling spot (?), washi tape (American Crafts), chipboard (Bo Bunny) and pen (Project Life)

   On this page I ended up doing two journaling spots on here. The first one is hidden due to the fact it was a lot to the story. Plus, writing this post I just realized it. LOL. I never said I was fully on the ball.

   The last journaling spot just was written on washi tape. It just name were each photo was taken.

   I am sad to say farewell to this inspiring team but I am glad I was able to be called a game player for a year.