Tuesday, June 30, 2015

Meet George - SBC #FlashbackFriday

   This upcoming sketch is from a flashback friday sketch reveal from Scrapbook Challenges. 
   This is what I came up with. 
Supplies: cardstock (Core'dinations), pattern paper (American Crafts, Studio Calico and Jillibean Soup), stickers (My Mind's Eye), wood veneer (Studio Calico),  journaling card (Project Life), gelato (Faber-Castell), mask (Studio Calico), modeling paste (Liquitex) and doily (Doodlebug Design)

   I have to be honest and say I am not a fan of this page but I am glad I scrapped about this plant my parents have had for 30 years. It is older than my brother and I. That has to be a record for this family since plants tend to die on us. 

Thursday, June 25, 2015

All Wrapped Up - SBC Trend

In May, we focused on the foil trend that is all the rage in the paper crafting industry. 
   I love this trend and I knew I had a pad of paper that had tons of foiling throughout it. It is funny how this is so popular right now because this paper I used is about three years old. 
Supplies: pattern paper (Die Cuts With a View and Crate Paper), doily (Doodlebug Design), washi tape (We R Memory Keepers), gelato (Faber-Castell), stickers (Prima, American Crafts and Studio Calico), chipboard (Prima) and canvas embellishments (Studio Calico)

   One thing I love about this paper is that the foiling acts like a resits so I was able to use gelatos without it messing up the pattern. 

   Thanks for stopping by and be sure to keep popping in to see more of the Scrapbook Challenges backlog of projects I am sharing.


Tuesday, June 23, 2015

The Gamer - SBC #445

   This week over at Scrapbook Challenges was a great sketch #445  reveal. I loved this sketch and I made it super ahead of time but forgot one thing. I forgot to submit it to be on the reveal post. That was a first. Even, though, I did that I still want to share it here.
   Here is my take on it.
 Supplies: cardstock (The Paper Studio and Die Cuts With a View), pattern paper (Kaiser Craft and Crate Paper), washi tape (Scotch Brand), die cuts (Teresa Collins, Kaiser Craft and Crate Paper), stickers (Jillibean Soup), doily (The Paper Studio), stitching template (American Crafts), mist (Tattered Angels) and embroidery floss.

   I am sure you are like me and you have pattern paper in your stash you will never use. I decided I have too much of that so I am starting to use the plain white side to replace white cardstock. This way I get to use some stash and not have to go out and spend money for white cardstock. 

   The "THE" in the title is stitched with black embroidery floss. I am still in love with hand stitching and it doesn't look like I will be out of love for that any time soon.

Monday, June 1, 2015

Love That Bottle - SBC 442

    Remember me? I am the girl that shares her work on this blog, who set up a weekly routing on posting and who epicly failed at it three weeks ago.  I am happy to say that this week I am remedying that problem. To kick that off, I am posting this week's sketch reveal from Scrapbook Challenges. 
The sketch #442 is a great one to eliminate some of those odd scraps that we scrappers like to hold on to for something special. 
   Here is my take on it. 
Supplies: cardstock (The Paper Studio), pattern paper (Fancy Pants Designs, Studio Calico card kit paper pad and Glitz Designs), doily (Doodlebug Design), stickers (Jillibean Soup and My Mind's Eye), twine (Timeless Twine), stitching template (American Crafts), mists (Tattered Angels), pen (Project Life) and washi tape (Scotch Brand).

   I love to add a little extra depth to my flat alphas by just outline them with a 05 pen.

   Thanks for dropping by and I am sure there will be more posts. I am thinking about adding some food posts. 

Sunday, May 10, 2015

Pinkfresh Studio Crop = Christmas ?

   Last weekend I celebrated National Scrapbook Day with a lot of online challenges and crops. I was involved in at least six different sites. I can say I got a lot of layouts completed even though I was feeling under the weather. Right now, I want to share the three projects I created for the Pinkfresh Studio crop. 

This page is based on the Pinkfresh Studio layout sketch. 
   Here is my take on it.
 Supplies: cardstock (Core'dinations and Bazzill), pattern paper (American Crafts and Carta Bella), stickers (My Mind's Eye and Elle's Studio), chipboard (October Afternoon), sequins (Fancy Pants), twine (Timeless Twine), journaling card (Project Life), wood veneers (Target and American Crafts), doily (Sunny-side Bakery), stitching template (American Crafts) and mist (Tattered Angels and Heidi Swapp).

   Here is a close-up of the title.
    Since the I didn't have really a spot for writing I just tucked a project life card under a photo.

The upcoming layout was done for the sequins challenge from Pinkfresh Studio and I also used a Let's Get Sketchy sketch from Team A May week 1. 
   Here is my take on it.
 
Supplies: cardstock (The Paper Studio and American Crafts), pattern paper (Heidi Swapp), die cuts (Fancy Pants), doily (SRM Stickers), sequins (Fancy Pants), stickers (American Crafts, Carta Bella and October Afternoon), and electronic die cutter machine, cartridge and software (Provo Craft).

   Here is a close-up on the title. 

 This card is from the Pinkfresh Studio card sketch challenge. 

Here is my take on this sketch.
Supplies (American Crafts), washi tape (Scotch Brand, My Mind's Eye and Target), sequins (Tree House Studio), mist (Tattered Angels), canvas butterfly (Studio Calico), stamps (Studio Calico), ink (Memento and Close to My Heart) and diy enamel dot.

Thanks for popping by and checking out just a couple of my projects I did on NSD.

Friday, May 8, 2015

Simulation and Hopeful

   TGIF. This week went by so fast for me. I ended up losing a day's worth of work because of seasonal allergies. Draining sinuses, sure can take a toll on a throat and tummy. Plus, when I get the bad allergies I run an almost 102 temp. I am happy to say I feel better. 

    A couple of days ago I came across this site that simulates your current vision as it would be without correction of eyeglasses. I thought this was pretty neat. The only thing is that it is not 100% accurate for my case. With my left eye I can't be corrected with eyeglasses because of kc, so this is how I see with them. Plus, their needs to be some ghosting (double vision). I am happy my brain figured out how to rely on the right eye when I do need to wear eyeglasses.  
  Here is how I see the world. 

   I am currently heading for eye appointments every other week and picking up a new lens on the weeks I don't have an appointment. Since Jan. 21, I am on my 9th contact lens change. The current one seems like the fit is still off. It is the same size as my right eye (which makes it hard to pop in), curve more, thinner in the center and prescription is higher (-6.50).
   Even if this does fit, I am still thinking about going to see about a Scleral lens because these lenses vault over the cornea and are filled with a saline that keeps the eye moist. The thing that is holding me back is the time and money. Going this route might mean a new car since ours haven't been acting great. Plus, the lens could cost $4,000. yes that is only for one contact lens.
   Still, there is no word of when or if the FDA is going to approve the crosslinking. As soon, as that is done I will be getting it done. I was concerned about having the epi-off (9mm of epithelium is removed) because of the pain and corneal haze. After much research on my part, it looks like it is the one with the best outcome of working. When this does happen, expect to see this blog to be quite for a couple of months while I let my eye heal and my vision return to normal, while not normal as in that sense. After it is done my vision will be worse that what it was before.
You can see all my previous posts about KC here, here, here, here and here

Thursday, May 7, 2015

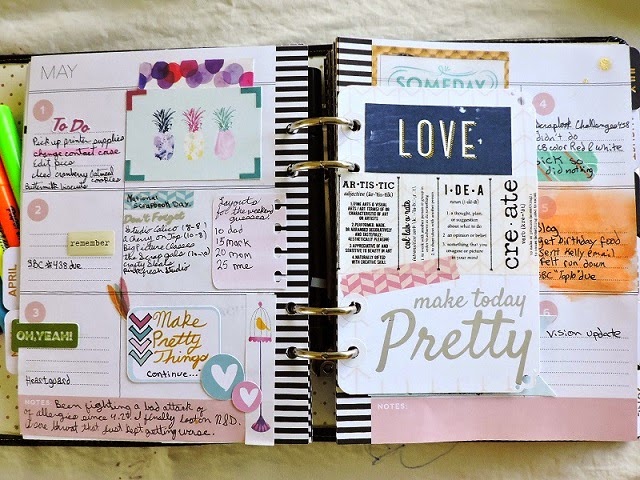
First Planner Share - SG

      First, I want to say I am on a new team and this time it is for an online store that is getting some cute things. SHE Glossy, is the name and I want to say that the links to the store you will find on my blog are affiliate.
   Today, I want to share my take on the whole planner craze. I was recently accepted on a new store design team, SHE Glossy, as part of their planner team. Let's just say I love the whole process of  setting an hour out of my Sunday to decorate my week ahead. The planner I am using is one of the memory planners from Heidi Swapp. 

 Most of the items came from the SHE Glossy store. Other items includes: gelato (Faber-Castell), washi (Scotch Brand and Hazel & Ruby), stamp (American Crafts), corner punch (Fiskars) and  stickers (Target and My Mind's Eye)

   The "To Do Stamp" is something I found at my local Marshall's. I couldn't pass it up since it was $3.99. I also, saw them at Tuesday Morning. 

   On this page I used most of the items that are in the SHE Glossy planner section on the store.
    This PL card came in their Just Darling kit. I just add my own personal touch with some Hazel & Ruby washi tape, a piece of paper from Dear Lizzy collection and punched the corners with a fancy punch.
Thanks for stopping by. 

Tuesday, May 5, 2015

Envelope Recipe Keeper

   Over at Canvas Corp Brands blog the entire creative crew were issued a challenge to create a way to save recipes. For this I knew I didn't want to create a normal recipe box but I didn't know what to create until I go the mail a couple of weeks ago. In the mail were some cards from a pet rescue. I always keep the cards to make gift tags but this time I also kept the envelopes. I left the envelopes on my desk when I started to start this challenge. When I made the cards I ws like these fit perfectly in them so I just went with it. In the end, I had something like this. 

Supplies from Canvas Corp Brands:
Other items:
Sewing machine
Black thread
Doilies (Doodlebug and Sunny-side Bakery)
 Bias ribbon
Corner punch (Fiskars)
Ivory envelopes
Directions:
1. Cut cardstock to 4" x 6" and pattern papers to 3 3/4" x 5 3/4". Adhere and punch corners.
2. Fussy cut cooking pots from pattern paper. Adhere and paint with the glimmer glam. 
3. Tie cord to tag and attach to recipe card.
4. Decorate the fronts of envelopes with doilies tags and mist. 
5. Stack envelopes and stitched along what would have been the bottoms
6. Glue ribbon on the back. Let dry and braid the loose ends.
7. When done add the tape to the front and tie close.
 
The finish project. 
 
Here is what each page looks like. 

Monday, April 27, 2015

Scrapbook Challenges Reveal and News

  First off, I will share my latest page for Scrapbook Challenges before I share the news. This is the newest sketch #437 reveal is a fun and it offers a lot of endless possibilities. 
   Here is my take on it. 
 
Supplies: cardstock (Bazzill Basics), pattern paper (Die Cuts With a View, Cosmo Cricket and Studio Calico), stickers (Basic Grey and My Mind's Eye), tags (Elle's Studio and K & Co.), doily (The Paper Studio), wood veneer (Momenta), enamel dots (My Mind's Eye), modeling paste (Liquidex), sequins (Studio Calico), washi tape (Scotch Brand), mist (Tattered Angels) and mask (The Crafter's Workshop)

  Here is a closeup of the title. 

   Now onto my news. Earlier this month, I sent in an application to be part of a design team for an online store called SHE Glossy. Last week, I got word that I have made it. Happy dance on a day I was a little bummed about a mistake I made. To the added of excitement, I was being placed on their planner team.  For the next five months you will be seeing my planner pages featuring items that are from the SHE Glossy store. 

Saturday, April 25, 2015

Home Decor Featuring Tattered Angels - CCB

  Hello and welcome to another home decor project i have created as a part of the Canvas Corp. Brands creative crew. This time I am revamping some fall color candles into a beachy theme. 

Supplies from Canvas Corp. Brands:
Other:
Flameless candle
Liquid glue

Directions:
   Step 1: Wrap candle with the paper tape.
    Step 2: Paint the paper tape with stain glass. I did two coats. This gave it a nice ocean blue color.
    Step 3: Mist the rope with the brown mist.
    Step 4: Using your favorite liquid glue attach the rope to the paper tape.
   Tip: Using the paper tape and adding any alterations on top of it allows you to remove the wrap without any damage to the candle. This is a cheap and simple way to dress up a out of season candle and  make use of it at any given time.
   Be sure to stop by the Canvas Corp Brands blog to see what the other members of the creative crew has made.