Thursday, April 28, 2016

Altered Jean Skirt

  Welcome to week two of the month long Thursday fashion series. This week I am going to be sharing on how to bring new life into a well loved jean skirt.

   Here is the skirt I used. It was an old skirt that I have had for years, as you can see  the bottom of it looks faded. For this alteration I just needed some lace fabric and a solid scrap fabric. 
   1. I cut 6 inches off the bottom since I wanted to get rid of the slit in the back.
   2. I serged the edge to stop it from fraying. Next, I fold under edge a half inch and ironed it. That pressed edge is the new bottom hem.
   3. Measure the opening of the bottom, mine was 42" so I cut two pieces of lace fabric 43" x 20" land one piece of solid fabric 43" x 6". I them sewed all the fabric into long tubes, pinned them to the inside of the skirt and stitched them in place.

   4. I am in love with the high low skirts so I ended up laying the skirt out flat with the front matching the front and back matching the back. I then cut the bottom in a curve with the back being long and shorter in the front.
   Since I cut so much of the jean fabric off the skirt I added this fabric to the inside of the skirt for modesty.

   Looking at this photo I can see I still need to do some more cutting on the lace since it is not high enough in the front. 

Monday, April 25, 2016

Grandma's Joy - SBC 480

   This #480 layout sketch reveal from Scrapbook Challenges is so great that I had to use the fun circles on the background. 

   See. I pencil sketch the circles on the cardstock and machine stitched them. 
Supplies: cardstock (Bazzill Basics), pattern paper (American Crafts, Echo Park and Crate Paper), doily (Doodlebug Designs), stickers (American Crafts), washi tape (The Paper Studio), stain (Tim Holtz), sewing machine (Singer), tread (Coats & Clark), bakers twine (Bella Creationz), watercolor crayon (Faber-Castell), wood veneers (American Crafts), paint (Americana) and mist (Tattered Angels)

Here is a closer look at this page. 

   I found that the Echo Park paper was a little too bright for this page so I added distress stain along the edges. 
 Don't forget to link up your creations on the Mr. Linky at Scrapbook Challenges to have a chance at winning this month's prize.


Friday, April 22, 2016

There is Always Time for Cake - SBC Liftapalooza


Here is the inspiration piece from Stacia that Scrapbook Challenges  shared for this scraplift challenge.


   Here is my take. I used items all from one collection since I know how Stacia works 

Supplies: cardstock (Die Cuts With a View), pattern paper (American Crafts), die cuts (American Crafts), wood dots (American Crafts), stickers (American Crafts), watercolor crayon (Faber-Castell) and mist (Tattered Angels and Ranger)

   As you can tell I am still loving this True Stories collection by Shimelle Lain. I think it is perfect for birthday pages. I cut one of the quote papers down to strips to make it the title of the page. This allowed it not to compete with the photos since it was broken down. I recolored the pink wording with watercolor. 

   Here is a closer look at the corner cluster. I love that it kind of looks like a banner,
 Don't forget to link up your creations on the Mr. Linky at Scrapbook Challenges to have a chance at winning this month's prize.


Thursday, April 21, 2016

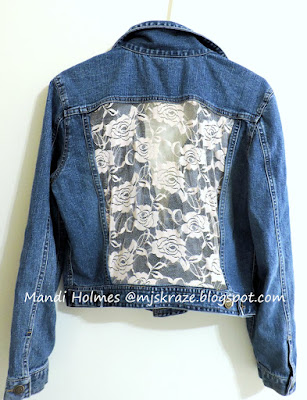
Altered Jean Jacket

   When it comes to the change of seasons I always look through my closet to see if there is anything I want to donate, need to fix or alter. I came across of this jean jacket that I had iron-on a decal years ago but fell off. You can still see part of the design and I also noticed a hole was also appearing. I was just about to get rid of it but then thought of a way to save it. 
  1. cut out the back but leave about an 1" border around the original seams.
   2.  Fold excess fabric to inside of jacket and iron.
3. Pin lace to the inside of jacket and stitch.

   Here is the final product. It is a nice way to freshen up a old jacket. Plus, it is a cheap way to add a "new" trendy item to your wardrobe.
   I love the blush color of this lace fabric I got from Hobby Lobby. For this alteration it cost me under $5.

   If you like this post be sure to come back next Thursday because this part of a Fashion series I will be sharing here every Thursday for the next month or so. 

Wednesday, April 20, 2016

Lake Michigan - SBC Liftapalooza


Here is the inspiration piece from Natalie that Scrapbook Challenges  shared for this scraplift challenge. 

   Here is my take on it
Supplies: cardstock (Die Cuts With a View), pattern paper (Crate Paper, Karen Foster, Echo Park and Webster's Pages), watercolor crayon (Faber-Castell), doily (Studio Calico), letter tiles (Doodlebug Designs), electronic die cutter, cartridge and software(Cricut). 

   Here is a closer look. 

   I am still in the use up my stash mode. I am loving tucking al those small scraps behind the photo. 
 Don't forget to link up your creations on the Mr. Linky at Scrapbook Challenges to have a chance at winning this month's prize.

Monday, April 18, 2016

Score - SBC 479

   Today's #479 sketch over at Scrapbook Challenges is a super simple one. 

   Here is my take on it.
Supplies: cardstock (The Paper Studio and Bazzill Basics), pattern paper (Basic Grey and Crate Paper), washi tape (Scotch Brand, My Mind's Eye and Studio Calico), sequins (Studio Calico), mist (Heidi Swapp), mask (The Crafter's Workshop), embossing folder (Sizzix), embossing machine (Sizzix), tag (chic Tags), modeling paste (Liquitex), manual die (Spellbinders), die cutter machine (SpellbinderS), flair (Zappy Dots), marker (Faber-Castell) and pen (Project Life) 

Here is a closer look. 
   I wrote out the date in pen first but i didn't like it blended in too puch with the pattern of the tag so I wrote over it in marker to give it more depth.

   This badge originally had "football Mom" on it but so I covered "mom" with a piece of washi. Perfect fix for the on;y football theme item in my stash. 
 Don't forget to link up your creations on the Mr. Linky at Scrapbook Challenges to have a chance at winning this month's prize.

Sunday, April 17, 2016

Going Slow

   That is what time has been doing ever since I got home 2 weeks ago from my second cxl eye surgery. The day after my birthday, my birthday was busy preparing for the trip and had to go to bed super early, my dad and I headed down to Ohio to have my other eye done since I was starting to notice the vision started to become double more. I really wanted to have the surgery done to keep the vision from becoming like the other eye.

   Friday, consisted of a 230 mile trip which meant getting up at 5:20 to get to the 11 a.m appointment. The drive down there was perfect. We timed the trip just right because by the time we got to their office my appointment was in 15 minutes. After a few tests, I got my eye dilated which was glad I only needed it done to one because it is very hard to fill out forms with both of them done :).

   Saturday, was surgery day and it was an early one, I had to be there at 7:45. This time I opted out for the sedative since I hated feeling so lightheaded last time. I also didn't take a pain med before but wished I did since the pain set in by the time I got back to the hotel room. After getting the surface of the eye buffed by a laser, I was sent into another room for 30 minutes of riboflavin eye drops every 45 seconds. Next was getting my eye looked at to see if the eye was soaked with the drops, I could have told them it was since my vision had a nice yellow tint. At this moment I had three doctors looked at, my optometrist, my surgeon and a visiting doctor.From that moment, I got referred to as Wiley's special crosslinking patient, I am guessing because I opted for no meds or the fact I am know what I need to do before they tell me.. Next, it was time to stare at the UVA light for 30 minutes, it is a little blue light that turns on for about 15 seconds and off for about the same length. After the first 10 minutes I couldn't wait for the timer to go off since I was starting a hard time seeing it.
   When it was all done the surgeon came in put drops in the eye and placed the bandage in place. Him and the  nurse said that they needed more patients like me since I made the whole thing easy since I sat perfectly still for the whole hour. After, it was all done the nurse and surgeon took my to another room to get my photo taken. I now realized why the nurse asked if I wanted my dad to come and sit with me. I sure don't look like I am 27 here. This was taken right when the pain started. I was smiling right before the photo was taken but started to fade since the nurse didn't know if she could get a pic since the camera was dying so I was caught a little off guard.
    Back at the hotel, I took the pain med but it didn't touch it so I tried to sleep for the 4-6 hours I was told to do before starting the eye drops every two hours. After I had two pain meds in me I watered to feel better, however, I still couldn't get the eye open and it was watering non-stop. The next day was not better. When it came time to get the bandage removed the doctor said this won't hurt. He was WRONG. It hurt so much that I tightened up my jaw. Thank God, for the numbing drops by the time I left I felt no pain, I just wished they lasted longer. On the way home, I had to keep popping pretzels in my mouth so my mouth had something to clamp on since the comfort drops only lasted for 10 minutes and the pain med didn't keep in until I had two in my system since I skipped taking them at night and morning. By Tuesday, I had no more pain. This was the second most painful thing in my life.

Now, my vision is changing daily so most of the time I am not wearing glasses since they are too strong. This makes it kind of hard to decided on what to do since I need correction and I believe the other eye is stable to get a new rx for glasses and contacts. I am honesty thinking of going correction free for the next three months and just living with the ghosting. I wonder how long I will stick to that since my eyes seem to get tired pretty fast.

Friday, April 15, 2016

Peekaboo - SBC Liftapalooza

Here is the inspiration piece from Lyne that Scrapbook Challenges  shared for this scraplift challenge. 

   Here is my take on it.
Supplies: cardstock (Die Cuts With a View, Bazzill Basics and American Crafts), pattern paper (Fancy Pants Designs), washi tape (Target and My Mind's Eye), stickers (October Afternoon,Making Memories, Pink Paislee and American Crafts), twine (Bella Creationz), mask (The Crafters Workshop), mist (Heidi Swapp and Tattered Angels), tag (Studio Calico), wood veneers (American Crafts), paperclip (Freckled Fawn), and pen (Project Life)

I don't usually mix fonts in the same word but I thought it added a little cute touch to this page. 
 Don't forget to link up your creations on the Mr. Linky at Scrapbook Challenges to have a chance at winning this month's prize.

Wednesday, April 13, 2016

The Sightseers - SBC Liftapalooza


Here is the inspiration piece from Katie that Scrapbook Challenges  shared for this scraplift challenge. 


   I think this would have to be my all time favorite page I have created so far in 2016. I am loving that pattern paper is minimal and stickers came out to play, which didn't look like the sticker snezzee. 
Supplies: cardstock (Die Cuts With a View and Bazzill), pattern paper (American Crafts, Fancy Pants Designs and Studio Calico), die cuts (Studio Calico), Stickers (Studio Calico, Pink Paislee and American Crafts), tags (Studio Calico), enamel dot (My Mind's Eye), doily (Doodlebug Designs), electronic die cutter, cartridge and software (Cricut) and pen (Project Life)

   Here are a few close ups. I journaled about some fact of this historical Hollywood site and of who was in the photo.

   I love all the layers around the photo. I have flat stickers, die cuts and chipboard pieces all tucked around the photo. 

 Don't forget to link up your creations on the Mr. Linky at Scrapbook Challenges to have a chance at winning this month's prize.