Showing posts with label tim holtz. Show all posts

Sunday, December 4, 2022

Wreath Ornament

   Can you believe it is Dec. 4th already? This summer I haven't been that crafty for me since I have been dealing with some intense headaches due to my eye problems. I am happy to say that has been solved so I am I have been in full holiday mode since Nov. 

Yesterday, I made this cute tree ornament from a Mason jar lid rim. I have a box of those lids in my craft closet since I use the plastic lids on the jars instead.

I wrapped the rim with green florist tape, you could do ribbon or paint it but this is what I had on hand.
I then took green cardstock scraps and die cut the greenery, the dies are from Crafter's Companion and Tim Holtz by Sizzix. 
  • The larger diecuts to the top.
  • The longer, thiner diecuts are glued on the side of the rim. 
  • The small ones are stuck where there need a little filler. 
I then die cut some cirecles from mirror cardstock and glued them to top to create "berries".
Just add a bow and a twine hanger and it is done. 


 Now, I am off to make more since like I said before I have a box of these lids and they have been untouched for years. 


Friday, August 7, 2020

Pocket Card - Dies R Us

Today's blog post is a fun how-to to create a card with an inside pocket. 
   
I created a little diagram to help visual learners.  Once you got the card base cut and scored place the die on the card front and die cut it. 
  As you can see I used the love word die from Paper Smooches. Keep the die-cut handy since we will be using it in a minute. I wanted to keep this card simple so I just fussy cut a watercolor stamped image and used foam tape to pop it up on to the card. 
   Cover the angle piece with your desired paper. Now fold the card so the angle cut is on the inside of the card. Glue along the inner and bottom edges. With the card close glue the love die-cut on the inside of the card by placing it in the negative area of the card front. Accent the sentiment with a Funky Floral #3 die-cut. 
   For the finishing inside touch, I added the same Funky Floral #3. With this inside pocket, it is great to hold a gift card. 
  Here is the completed card. 


Don't forget to come to join in the fun at the Dies R Us Challenge Blog.  There's a new challenge theme offered on the 1st and 15th of each month and one lucky randomly drawn winner will receive a gift voucher prize to the Dies R Us Store.  For your convenience, all the important Dies R Us links are provided below.


Click below for:

Friday, July 17, 2020

Christmas Table

   Hello everyone, today I will be sharing Christmas project since it is Christmas in July. Today I will be sharing how-to create simple place setting cards.
   Step 1. Fold cardstock in half. Tape the die the cardstock making sure the top of the die overhang the fold. Run it through the die cutter, this will create the card base. 
    Step 2. Die-cut next smaller size in the nesting die set.  Also, at this time die cut the Sizzix Tim Holtz Funky Floral #3  flower. For the flower center, I used a sequin. Adhere everything to the place card. 
 Step 3. Type names on cardstock, trim strips, and tuck it under the flower. To make the cards stand up straight just trim off the bottom to create a flat edge. 
Dies R Us Product Used:

Don't forget to come to join in the fun at the Dies R Us Challenge Blog.  There's a new challenge theme offered on the 1st and 15th of each month and one lucky randomly drawn winner will receive a gift voucher prize to the Dies R Us Store.  For your convenience, all the important Dies R Us links are provided below.


Click below for:
FRIENDS OF DIES R US PINTEREST PAGE

Thanks for stopping by!

Friday, April 24, 2020

Dies R Us Pop-up How To

   Last week, I shared with you are love card and today, I will be showing you how to use die cuts on the inside of your card with a simple pop-up feature. 

   First off cut liner card base a 1/4" smaller than you card base. Here I did a folded 5 1/4"x 4" so it fits an A2 card. I wanted two pop-up features so I did 4 horizontal cuts along the fold, 2 cuts are about 1" and the other 2 are about 3/4". Then connect the matching cuts with a vertical scoreline.
   Push the two pop-ups in so it looks like this. Adhere cardstock liner to your card base. 
    When it comes to adding the die cuts, you want to adhere it to one side of the folded mechanism so the fold is free to move. I used the lovely butterfly dies from Jeanine's Art.  I had one die-cut on the right side of the top fold and the bottom fold it is on the left. To tie the front card design to the inside, I added some of the Tim Holtz Funky Floral die cuts from Sizzix to the writing area. Here is what the inside of the card looks like.
   Now let's look back to the outside. See how decorating the inside can make a handmade card look even more special. 


Don't forget to come to join in the fun at the Dies R Us Challenge Blog.  There's a new challenge theme offered on the 1st and 15th of each month and one lucky randomly drawn winner will receive a gift voucher prize to the Dies R Us Store.  For your convenience, all the important Dies R Us links are provided below.


Click below for:
FRIENDS OF DIES R US PINTEREST PAGE

Thanks for stopping by!


Friday, April 17, 2020

Love Card For Dies R Us

   Today I am up on the design blog for Dies R Us. I want to share with you how to create a pattern paper using die cuts. This is what the finished project looks like. 


   To get started I used the Funky Floral Him Holtz die from Sizzix. I love the large flower so I die cut it in two colors of cardstocks and I die cut the fringe flower centers kraft, those will be used later.   I adhere it to a cardstock panel that will go on a card front. 


   I trimmed any of the overhangs die cuts and adhere it to a card base that had pattern paper on it. To make the flowers pop I took a .08 pen and outline the die cuts. I then added a little metallic washi tape along the top. 

   Now onto the finishing touches. I added the fringe flower and yellow sequins for the centers. I top it off with the "love" die cut from Paper Smooches


Don't forget to come to join in the fun at the Dies R Us Challenge Blog.  There's a new challenge theme offered on the 1st and 15th of each month and one lucky randomly drawn winner will receive a gift voucher prize to the Dies R Us Store.  For your convenience, all the important Dies R Us links are provided below.


Click below for:
FRIENDS OF DIES R US PINTEREST PAGE

Thanks for stopping by!

Tuesday, August 9, 2016

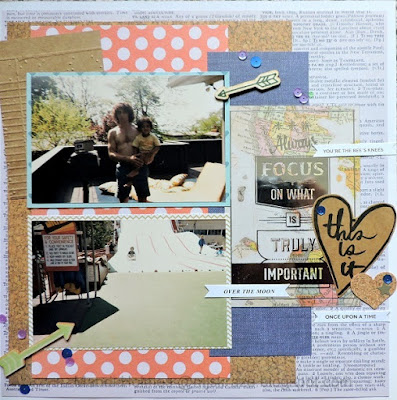
Always Focus... - SBC SS 05

   Sizzling Summer sketch #05 at Scrapbook Challenges is one that I ended up creating back in May when I was keeping myself busy at the family business. 

   Here is my take on it. 

Supplies: cardstock (Die Cuts With a View and The Paper Studio), pattern paper (American Crafts and Fancy Pants Designs), stamp (Heidi Swapp), ink (Tsukineko), wood veneer (Crate Paper), sequins (SpiegleMom Scraps), overlay (American Crafts), tags (Studio Calico), cork die cut (SpiegleMom Scraps) embossing folder (Sizzix) embossing machine (Sizzix)

   Here is a closer look. I love how this title area came out. The SpiegleMom Scraps items were the perfect touch to this area. Don't forget if you are getting some items there use coupon code mandi15 for 15% off. 
   I even broke out an old brag paper pad from Fancy Pants to mat the photos.
 Don't forget to link up your creations on the Mr. Linky at Scrapbook Challenges to have a chance at winning this month's prize.

Monday, April 11, 2016

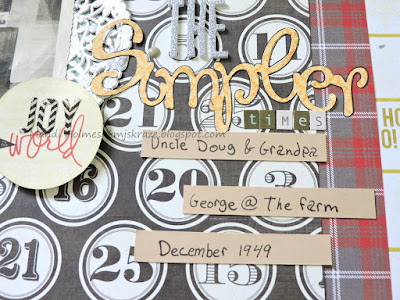
The Simpler Times - SBC 478

   This sketch reveal for Scrapbook Challenges was another one I created. I have to say I so much prefer drawing sketches by hand that on the computer. I am happy that Brynn- Marie is able to clean the sketches up on the computer because I am sure you would have a very hard time figuring out my handmade sketch.

Here is my take on it.

Supplies: cardstock (Bazzill Basics), pattern paper (Photo Play, Heidi Swapp, Graphic 45 and Basic Grey) stickers (American Crafts and Authentique), wood veneer (Target), embossing folders (Echo Park), inks (Tim Holtz and Close to My Heart), enamel dot (My Mind's Eye), doily (Studio Calico), border punch (EK Success), embossing machine (Sizzix), electronic die cutter, cartridge and software (Cricut), pen (Project Life) and glossy accents (Ranger)

   I am not sure if it is just a lazy thing or I just like the added interest but I always dot my electronic die cut "I"s with an enamel dot. I would like to believe it is the interest but I am pretty sure it is laziness since I don't want to bother gluing down that teeny tiny dot. 

   I am loving these Christmas/ winter theme embossing folders my Mom picked out for me. I am shocked she actually picked them out since I never showed her these. Using the faux letterpress technique sure makes the impression stand out.

Don't forget to link up your creations on the Mr. Linky at Scrapbook Challenges to have a chance at winning this month's prize.

Monday, December 21, 2015

Rough Crowd - SBC #463

   Where did the weekend go? My to-do list barley got touched. Hope you all had a more productive week. 
Today is sketch #463 reveal for Scrapbook Challenges. 

   As you can see, I kept this page super simple.
Supplies: cardstock (The Paper Studio), pattern paper (Glitz Design and KaiserCraft), stickers (American Crafts), embossing folder (Sizzix), ink (Momenta), electronic die cutter, cartridge and software (Cricut)

   I ended up doing one of my favorite techniques on the title letter die cuts. It is called faux letterpressing. That is when you ink up an embossing folder before you place the paper in it and run it through the embossing machine. I came up for the title of this page because that was the first thing that popped in my head about this photo of my mom, grandpa, uncles and cousin