Showing posts with label creative crew. Show all posts

Monday, October 26, 2015

Owl Have a Treat! or Trick - sbc #456

   Thanks for dropping by. Today, I am going to share a layout I created for the latest sketch reveal over at Scrapbook Challenges. It also features products from the Canvas Corp Brands family.
  The sketch #456 is a easy sketch to change around to fit the number of photos you are planning to use.
I
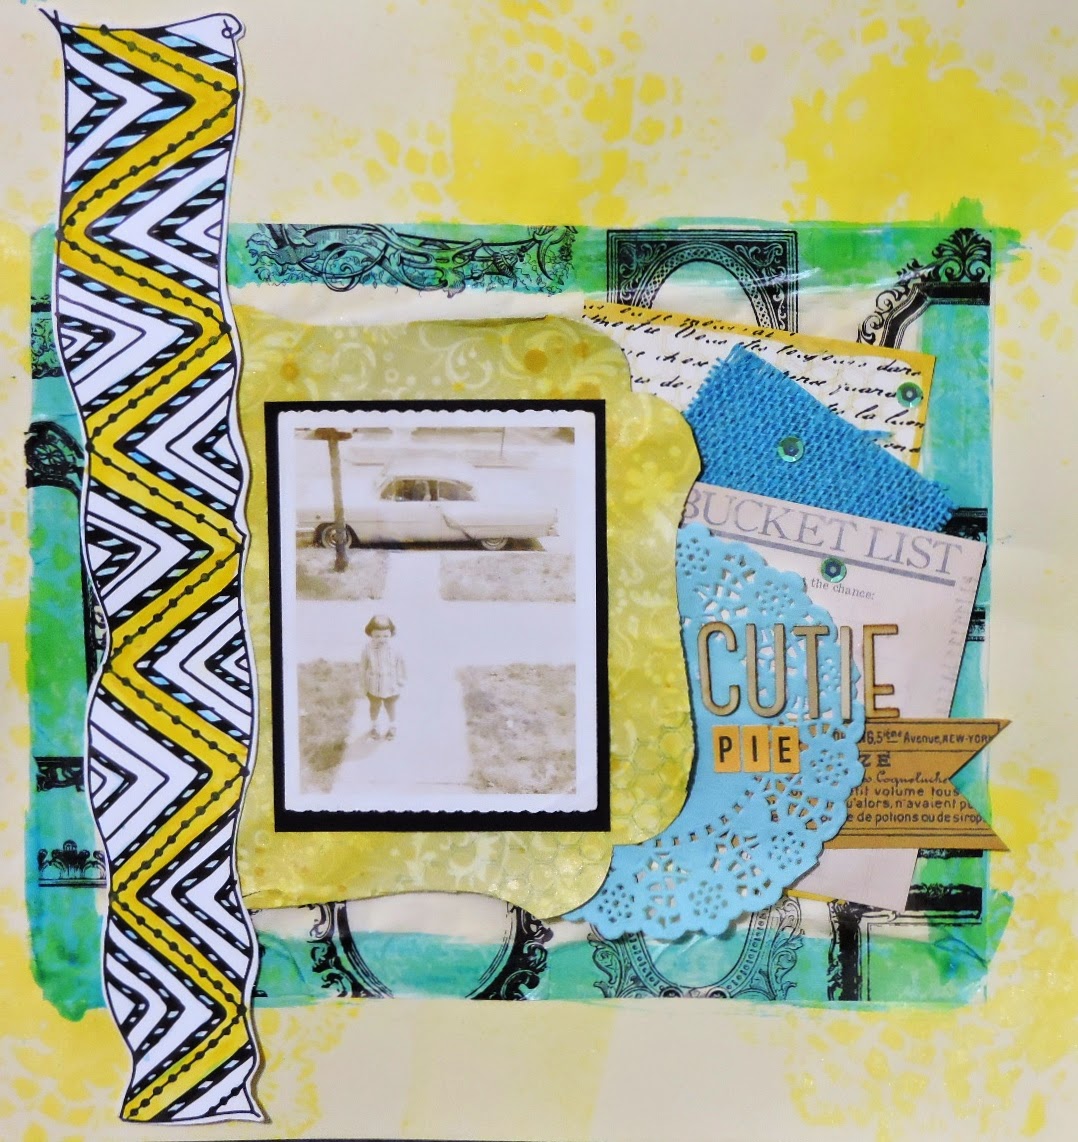
Supplies: pattern paper (7 Gypsies and Canvas Corp Home Basic), cardstock (Canvas Corp Home Basic), tissue tape (7 Gypsies), doily (Doodlebug Design), twine (Timeless Twine), diecuts (7 Gypsies), mist (Tattered Angels),  stitching template  (American Crafts), embossing folder (Moment) and electronic die cutter, cartridge and software (Cricut).

Here are a few close-ups. 

   I ran the title word through the embossing machine/ I fast way to add interest to a flat iece of cardstock. 

Tuesday, May 5, 2015

Envelope Recipe Keeper

   Over at Canvas Corp Brands blog the entire creative crew were issued a challenge to create a way to save recipes. For this I knew I didn't want to create a normal recipe box but I didn't know what to create until I go the mail a couple of weeks ago. In the mail were some cards from a pet rescue. I always keep the cards to make gift tags but this time I also kept the envelopes. I left the envelopes on my desk when I started to start this challenge. When I made the cards I ws like these fit perfectly in them so I just went with it. In the end, I had something like this. 

Supplies from Canvas Corp Brands:
Other items:
Sewing machine
Black thread
Doilies (Doodlebug and Sunny-side Bakery)
 Bias ribbon
Corner punch (Fiskars)
Ivory envelopes
Directions:
1. Cut cardstock to 4" x 6" and pattern papers to 3 3/4" x 5 3/4". Adhere and punch corners.
2. Fussy cut cooking pots from pattern paper. Adhere and paint with the glimmer glam. 
3. Tie cord to tag and attach to recipe card.
4. Decorate the fronts of envelopes with doilies tags and mist. 
5. Stack envelopes and stitched along what would have been the bottoms
6. Glue ribbon on the back. Let dry and braid the loose ends.
7. When done add the tape to the front and tie close.
 
The finish project. 
 
Here is what each page looks like. 

Saturday, April 25, 2015

Home Decor Featuring Tattered Angels - CCB

  Hello and welcome to another home decor project i have created as a part of the Canvas Corp. Brands creative crew. This time I am revamping some fall color candles into a beachy theme. 

Supplies from Canvas Corp. Brands:
Other:
Flameless candle
Liquid glue

Directions:
   Step 1: Wrap candle with the paper tape.
    Step 2: Paint the paper tape with stain glass. I did two coats. This gave it a nice ocean blue color.
    Step 3: Mist the rope with the brown mist.
    Step 4: Using your favorite liquid glue attach the rope to the paper tape.
   Tip: Using the paper tape and adding any alterations on top of it allows you to remove the wrap without any damage to the candle. This is a cheap and simple way to dress up a out of season candle and  make use of it at any given time.
   Be sure to stop by the Canvas Corp Brands blog to see what the other members of the creative crew has made.

Wednesday, April 8, 2015

A Project for the Kiddies - CCB

   This project I am about to share with you today is kid friendly. The challenge for the Canvas Corp Brands creative crew was to create a kid project that they would want to make and we would want to display it.  I thought about this long and decided a cute embroidery hoop wood be a great thing for a kid to work with. 
   I am going to share everything you will need and the steps on how your little ones can create this. 


Supplies from Canvas corp Brands:
Other items you will need: 
embroidery hoop
adhesive cork (Contact)
felt
stencil (The Crafter's Workshop)
Click on the image below to view images bigger.

Step 1: Mist gravel mist onto a cotton ball and rub it on top outer hoop.
Step 2: Using the inner hoop trace the outer edge onto the cork. Cut out with scissors. 
Step 3:  Put the felt in hoop and tighten. 
Step 4: Adhere the cork circle.
Step 5: Lay mask on top of hoop and mist with three remaining colors. I  started with the lighter shade in the center and work my way out using the darker tones. Remove mask. I picked these colors to use because I thought it blended in with the cork so it kind of give an optical illusion that the design isn't there unless you look at it a certain angle. I thought a kid would love that magical feature.  Step 6: Gather the fabric in the center.
Step 7: Wrap the center with just about four times tie a knot and leave the tails long.
Step 8: Attach bow and tag to hoop.
I am sure any kid would love to make this because it allows them to get messy. 

Friday, March 20, 2015

You're Invited - CCB

   This week over at Canvas Corp. Brands blog the creative crew members are sharing easy to mass produce invitations. These cards are ones that you wouldn't mind creating 50.
   Mine you just need a few supplies. You could get 6-8 cards out of two sheets of pattern paper. In other words, cost is very reasonable.
Supplies from Canvas Corp Brands:
Other:
Stamp ink (Memento)
Stamp (Studio G)
Doilies (Doodlebug Designs)

   Click on collage to get a closer look at my process. 
Step 1: Adhere pattern paper with liquid glue to card front.
Step 2: Adhere doily.
Step 3: Fussy cut out one of the vintage polaroids, apply the paper tape to the bottom and adhere to card.
Step 4: Stamp sentiment onto tag and adhere.
Step 5: To decorate the envelope just adhere the paper tape to the flap of the envelopes. 
Here is the finish product. Simple to create but they look stunning as if they did take a long time.
Thanks for dropping by and be sure to head over to the Canvas Corp Brands blog to see what the whole crew created for this challenge.  

Tuesday, March 17, 2015

Sunny Yellows and Blues Color Challenge - CCB

   This week's color combo spotlight is something nice and sunny. It has blue and yellow tones. Perfect color combo because the first day of Spring is this week. 

Supplies for Canvas Corp. Brands:
Other supplies: 
Ink (Stampabilities and Close to My Heart)
Mask (Prima)
Punch (We R Memory Keepers)
Sequins (Hazel & Ruby)
Wood veneer alphabets (Studio Calico)
Stickers (October Afternoon)
Doily (Doodlebug Design)
Cardstock (American Crafts)
Stamp (Deep Red Stamps) 
   This time instead of posting each photo of the steps separate. I created a collage. Just click on the image to make it bigger. I just realized some of the photos are out of order. I am sure you will be able to figure the right order from the written steps. 

Step 1: Mist cardstock with the canary yellow. I didn't care to wipe the mask off when it got covered in between sprays. I like how it left yellow blotches to the paper.  
Step 2: Adhere tissue paper and paint edges with the stain glass. 
Step 3: I took the green swirl paper from the paper pad and changed the color of it with the mists and stamped a honeycomb design in blue ink. Let dry.
Step 4: Punch paper with shape punch and adhere.
Step 5: Cut out the Tattered Tangle. Color with mist and stain glass. Adhere
Step 6: Paint the edges of script paper with the the daffodil mist. Adhere.Tip: I just unscrewed the bottle and used the stem of the pump as a brush.
Step 7: Adhere a square of burlap, journaling card, tag that has been cut into a dovetail and doily.
Step 8: Adhere sequins. 
Step 9: Mat photo and adhere.
Step 10: Add title

Here is the finish result. My favorite thing about this was that I could alter all my items with the Tattered Angels paints and mists. This allows one to stretch their supplies but get totally unique project.

Tuesday, March 10, 2015

Tattered Tangle Love Challenge

   It is time for a new challenge from the Canvas Corp Brand crews. This week our challenge was to highlight the Tattered Tangle papers by Tattered Angels. These papers are super fun to work with. They have fun designs that are done in black which allows it to take any color medium without the design being hidden. 
I have a tendency to forget to take a photo of the supplies before I start altering them so today I will just share a list of them with links to the products. 
Supplies from Canvas Corp Brands:
bittersweet chalkboard  
Other supplies:
Doily (Doodlebug Design)
Modeling paste (Liquitex)
Mask (The Crafter's Workshop)
Black thread
Sewing machine

Here is how I created this page:
Step 1: Cut apart the big swirl from the Tattered Tangle. Mist with the three yellow mists and paint the the corner section with cupcake glam. Stitch to background paper.
Step 2: Apply modeling paste design with mask. Splatter with green mist. Let dry. 
Step 3: Fussy cut book stack. Adhere doily and papers. 
Step 4: Trim a Love tangle to the size of the folder. Adhere.
Step 5: Color tattered tangle with the stain glass and glimmer glazes.
Step 6. Add your photos and journal inside of folder.

Thanks for stopping by and be sure to head over to the Canvas Corp Brands blog to see what the rest of the crew created with these great papers.

Thursday, February 26, 2015

Farmhouse Color Challenge

   Every week Canvas Corp Brands highlights a color palette. This week's palette is inspired by Farmhouse. I played along this week and added my own tweaks to it. As in instead of a deep green I went with a brighter version. 
  
Supplies for Canvas Corp Brands
Pots & Pans ivory
 Other supplies:
kraft cardstock (The Paper Studio)
doily (Doodlebug Design) - not in photo
mask (Prima)
pom-pom trim (Simplicity)

I am going to share with you the steps on how to create this page. 

Step 1. Mist the background paper with the Plain Jane mist. Splatter the Mantis chalkboard mist. Highlight some of the baking terms and items with the glaze.

Step 2. Add your cardstock and pattern papers.

Step 3. Mist the doily mask with the Plain Jane and chalkboard mists.

Step 4. Adhere polka dot paper and burlap. Use a nice thick liquid glue to adhere the burlap.
Step 5. Use the same glue to adhere the tags onto the fabric area. You can use regular adhesive for the one that is touching the paper.

Step 6. Tie twine to the recipe card and slide behind the top layer of pattern paper. This will be where you can write your recipe out on or the journaling.
Step 7. Add my all time favorite embellishment, a doily.

Step 7. Adhere mat and photo.
  This page is about a new recipe I found on Pinterest for Quinoa Pudding, think rice pudding. I made it last year for my mom on Mother's Day. She loved it.
   I would love to hear from my readers on how you like the step-by step photos on how I created my projects. Is there too many pics or steps, should I combine steps, etc? Am input is greatly appreciated.

Saturday, February 14, 2015

My Style - Canvas Corp Intro

   At the start of the creative crew welcoming we were given a fun challenge to create a canvas the best represent our style. The trick was to squeeze us into a 4 x 4 canvas. That is a small area for me to get my favorite things on but I did. I am going to share step-by-step photos and instructions on how I created my canvas. 
   This was actually my first project I created as a crew member but is the second one I posted. We got to share a little love first with cards. 
   I define me as someone who loves texture, color, get a little messy, layers and is addicted to doilies. 

I am providing links to all my Canvas Corp Brands supplies:
Other:
Doily (Doodlebug)
mask (Studio Calico)
modeling paste
liquid glue
 Step 1:
Cover canvas with tissue paper.

Step 2:
Wrap edge with tissue tape.

 Step 3:
Lay mask on top of fluted tile, apply mask and mist with chalkboard mist.

 Step 4:
Adhere tile and doily.

 Step 5:
Adhere tattered tangle. Highlight the words "good" with aqua glass and paint the background with lime glass.
 Step 6:
Cut little banners from paper scraps and adhere them and rope to canvas,

Step 7:
Paint the exposed tissue with the glaze.

   Please head over to the Canvas Corp Brands blog and vote for your favorite canvas. There is a lot of talented ladies there and I am lucky to be sharing my creative journey with them. One lucky creative crew member with the most votes will be given a canvas corp brands gift card so be sure to hop over to the blog and cast you vote for your favorite.

   Thanks for stopping by and be sure to check back for more projects, life updates, and yes, my dog's 14th birthday pics for next Sat.