Thursday, December 31, 2015

Flew By

   That is what this year did for me. It seems like last month that we just celebrated the new year. This year has been full of mix emotions it started out rough and it is going out a lot better than it started. In between that time a lot has happened and they were a few tears shed. I dealt with me eye health all year, traveled 1,400 miles total for eye surgery and exam and who knows how many just to my in town eye doctor. Buster had a surgery for a abscess, he also had a seizure and another infection. We also started the kitchen remodel

   Since it is the end of the year I like to do a 12 month highlight of my favorite blog post projects I did.   
February

   Here is to 2016. My this year be filled with great things and start to something amazing. May we experience good health, grow closer to one another and be content in our own skin.

Monday, December 28, 2015

Bad Timing - SBC #464

   This is Scrapbook Challenges last new sketch reveal for 2015. This sketch is #464 

   For this sketch really inspired mw to scrap the last of the fourth of July photos from this year. 
Supplies: cardstock (The Paper Studio), pattern paper (Die Cuts With a View and American Crafts), tag (Freckled Fawn), stamp (EK Success), ink (Momenta), wood veneer (Freckled Fawn), sequins (Fancy Pants Designs), stickers (American Crafts),

Here is a close-up. I love the tag and wood star that Kelly sent to me last month. 

   I called this layout bad timing since I was always missing the perfect firework shots.

Thursday, December 24, 2015

Merry Christmas

   Just wishing everyone a Merry Christmas. Enjoy and reflect on the reason for the season on this very special day.
God bless from my family to yours.

Monday, December 21, 2015

Rough Crowd - SBC #463

   Where did the weekend go? My to-do list barley got touched. Hope you all had a more productive week. 
Today is sketch #463 reveal for Scrapbook Challenges. 

   As you can see, I kept this page super simple.
Supplies: cardstock (The Paper Studio), pattern paper (Glitz Design and KaiserCraft), stickers (American Crafts), embossing folder (Sizzix), ink (Momenta), electronic die cutter, cartridge and software (Cricut)

   I ended up doing one of my favorite techniques on the title letter die cuts. It is called faux letterpressing. That is when you ink up an embossing folder before you place the paper in it and run it through the embossing machine. I came up for the title of this page because that was the first thing that popped in my head about this photo of my mom, grandpa, uncles and cousin 

Friday, December 18, 2015

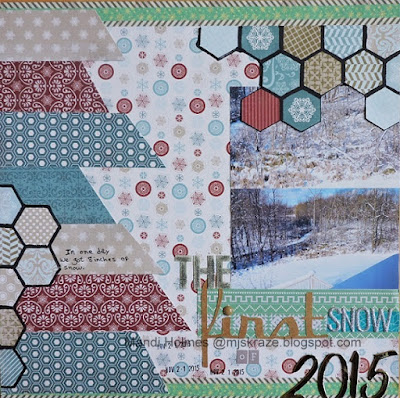
The First Snow of 2015 -SBC #FBF 329

   It is Friday and that means over at Scrapbook Challenges there is an updated sketch reveal. This week's update is sketch # 

   What are perfect sketch to document the first shovel-able snow of this year. The snow count was 6 inches and it was the week before Thanksgiving. It looked more like Christmas than this year's Christmas. 
Supplies: cardstock (The Paper Studio), pattern paper (Authentique and Studio Calico), stickers (American Crafts, Prima, Pink Paislee and My Mind's Eye), washi tape (Bella Blvd., Scotch Brand and American Crafts), stamp (EK Success), ink (Momenta), pen (Project Life), marker (Bic), and electronic die cutter, cartridge and software (Cricut). 

   Here is a closer look at the title and journaling. 


Tuesday, December 15, 2015

Guilty

   I have been a on little Christmas shopping splurge for me lately. I had order items from Studio Calico and Scrapbook.com and also snagged a great deal at Tuesday Morning. in the last few weeks.
I feel a little guilty but not too bad since I got some great deals.
At Studio Calico, I bought dome grab bags and kits during their black Friday sale so that was a $35 splurge but I only do that once a year.
This is what I got. It includes a mystery card kit, a mystery scrapbook kit, Amelia embossing folder, Amelia patterned paper, silver doilies, 2015 all gold grab bag, embellishment grab bag and a scrapbook grab bag.

I also placed my very first ordered on Scrapbook.com. The only reason I bought anything here was I won a $10 gift from them for uploading to their gallery.
I knew I wanted to get some new dye ink so I figured I would try a couple of brands. I ended up  buying the Umbrella Crafts mint dye ink, Hero Arts neon yellow ink pad, Merry Christmas stickers and Christmas Magic clear stamp. I guess I shouldn't call this a guilty purchase since I only paid shipping for this order.
I love the inks I bought. I stamped a wood mounted stamp inmage in black too conmpare it to the new inks I think the inks are great. They are juicy, coverage is good and colors are spot on.

The Tuesday Morning purchase consists of two packs of 25 sheets each of Bazzil cardstock for $3.99 each. I couldn't pass up on this deal since one pack was in grey and the other in oatmeal.

So I hope I am not the only one here that has did a little me shopping during the given season. I am justifying it by saying I spent very little this year and have been good at using my stash.


Monday, December 14, 2015

Good Times & Good Food - SBC #462

   Hope your weekend went as planned. Mine did. Saturday at was able to spend the day in the kitchen baking sugar cookies and sesame cookies. I also made hummus, falafel ans sesame seed sticks. Sunday I just frosted some of the sugar cookies, groomed Buster (bath, brushing and teeth cleaning) and went to a Christmas event at the historical village. It seems so wrong with Christmas right around the corner and it was in the 60's here in Michigan. My Christmas wish is snow. 

   Enough about my weekend and on to the Scrapbook Challenges sketch #462 reveal.

   I think the stars on the sketch made me want to scrap the Independence day celebration from this year. By the way it went and me forgetting about dying the daisies for the table you could say we all had other things on our minds since a week later my dad and I were going to travel 230+ miles for my eye surgery in a town we never been to and never spoke to any of the doctors. 
Supplies cardstock (The Paper Studio and Die Cuts With a View), pattern paper (My Mind's Eye, Crate Paper and Jillibean Soup), stickers (American Crafts, Prima and Simple Stories), twine (Timeless Twine), doily (Doodlebug Design), washi tape (My Mind's Eye, Bella Blvd. and Scotch Brand), stitching template (American Crafts), journaling card (Project Life), pen (Project Life), sequins (Fancy Pants), gelato (Faber-Castell), wood veneer (American Crafts), die cut (Jillibean Soup), border punch (Fiskars)

   Here are some closer looks. I outlined the canvas stickers from Prima since after I applied the red gelato it blended in to the background too much. 
   Those sequins were from a winter collection from Fancy Pants but the colors were the right tone for the patriotic page.


Saturday, December 12, 2015

Fataya...What?

   This post is might have some errors in it since I am currently typing this with one hand. The other hand is occupied with a 16 pound dog that is being held like a little baby. He is doing fine now and is off on all meds.

   Today's post I will be sharing a more time consuming recipe that happens to be of my mom's favorite food and is something we have to have for the holidays. It is a Lebanese dish called "Fataya", think hand meat pies that are loaded with lemon juice, olive oil and spices like cinnamon and all spice.

Ingredients for dough:
8 c. flour
3 Tbsp. extra virgin olive oil
1 Tbsp. salt
3 c. water heated to 110 degrees
1 package of yeast (2 1/4 tsp.)

Ingredients for filling:
2 1/2 c. fresh lemon juice
3/4 c. extra virgin olive oil
2 1/2 Tbsp. salt
3 Tbsp. cinnamon
3 Tbsp. all spice
2 large onions, chopped
3 lbs. ground meat (I use ground turkey)

Directions:
1.Pour water in a large mixing bowl. Dissolve yeast and salt. Let it get foamy about 5 minutes.
2. Mix in oil. Add the flour and mix until it starts climbing the dough hook on the mixer.
3. Let it rest in a warm draft-free spot until it doubles in size, about 1 hour.
4. Divide the dough into 36 rolls. Place on greased cookie sheets, cover and let rest for 30 minutes.
5. While the dough rest cook the meat.
6. Once the meat is done add in the seasonings, onions and lemon juice. Cook for about 5 minutes until most of the liquid is gone.
7. Stir in olive oil.
8. Take one roll and flatten it out on a floured surface. Take 2 tablespoons of feeling place in center of dough, then pinch half of one side together, and then pulled the center of the open flap up to the triangle tip and sealed up the two new sides, to form these lovely little triangles. Place on a greased cookie sheet that has sides. Bake in a 400 Fahrenheit oven for 20 minutes.
Tip:
To make it simpler and skip the dough making. Just use the Rhodes rolls frozen roll dough.

Friday, December 11, 2015

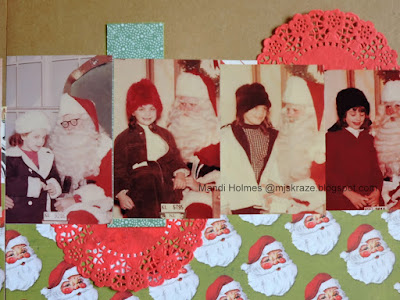
Santa & Me - SBC #FBF

   It is time for another Flashback Friday sketch. This week at Scrapbook Challenges we updated sketch #279


   I entitled this layout Santa & Me (while not me as in myself but my mom), I found the photos in  cute little cards that came with the photos and the front's said Santa & Me. 
Supplies: cardstock (The Paper Studio), pattern paper (Heidi Swapp and Studio Calico card kit paper pad), washi tape (American Crafts and Studio Calico), chipboard (Bo Bunny), stickers (American crafts), twine (Timeless Twine), doily (Doodlebug Design), stitching template (American Crafts), border punch (EK Success), pen (Project Life)

   Here are some close-ups since it is hard to see a double page spread online. 


   Don't you just love that look on my mom's face in that last photo on the right.


Thursday, December 10, 2015

Come Follow Me

   Sometimes I don't get around to all my social outlets every week so to be sure to follow me through
Facebook: https://www.facebook.com/mj.kraze
Instagram: http://instagram.com/mjskraze/
Pinterest: http://pinterest.com/cards4ever/
Bloglovin: https://www.bloglovin.com/people/mandih-3352317
I just started updating my gallery on Scrapbook.com so this is my current most up-to date place I share my work.  http://www.scrapbook.com/galleries/838859.html

Wednesday, December 9, 2015

Finally Did It

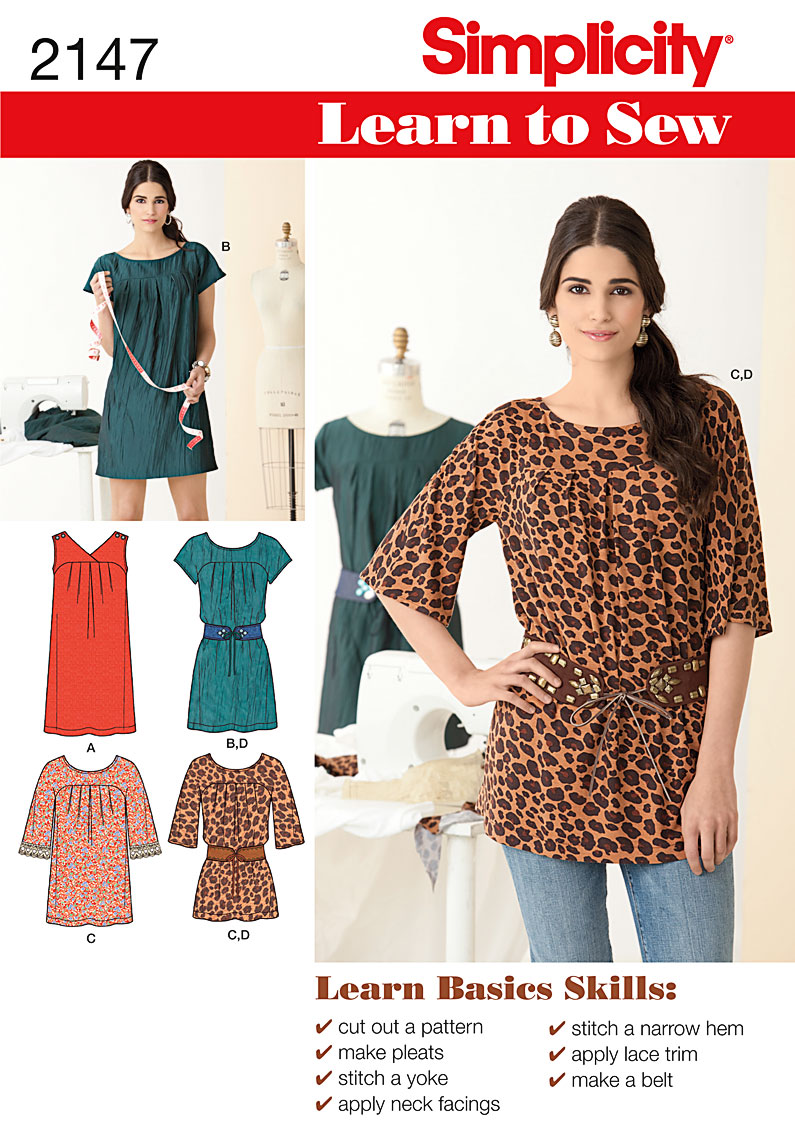
   Back in October I went to Hobby Lobby and bought  some solid black fabric and an Aztec print fabric that I was head over heels in love with. I already had a tunic pattern at home.
The reason it took so long to create it was I first had to do Buster's Captain America costume for Halloween, go to Ohio for an eye exam, start on birthday stuff for my dad's birthday, Thanksgiving,etc. However, the main reason was I was waiting for a contact lens that would allow me see the pattern cutting lines clear enough without seeing multiple images.
Fast forward to last weekend. I finally had the lens (that I thought would work). I cut the pattern out Friday and made the tunic Saturday night. I am happy to say it came out great and I ran into no problems doing it (no seam ripper came out). So if you are a beginner sewer I would highly recommend this.
This is the pattern I used.

   This is how my tunic came out. 

I know what I will be wearing this holiday season.

Tuesday, December 8, 2015

Ornaments Done Two Ways

   I am going to walk you through on how to turn a clear glass ornament bulb and two switch plate covers into two very different looking ornaments and all it take is just a little time. 

   In little as 30 minutes you could have these two unique ornaments tucked onto a tree or into gift bags for those unexpected last minute gifts you need to give.  
Supplies: cardstock (The Paper Studio), pattern paper (Heidi Swapp), sequins, twine (Timeless Twine), sticker (SRM Stickers), washi tape (American Crafts), ink (Close to my Heart), snowflake stamp, transparency, glass bulb and switch covers.

For the glass bulb, I just had my cricut cut out two 3" circle that fits into  a 3 1/4" bulb. I glued the circles together and trimmed of an 1/8" off the top. Add your sticker and roll up the paper in a tube so it can be popped into the bulb. Using a pencil or any small stick maneuver the paper until it is opened and flat. Fill with sequins and pop on the top, make sure the prawns on the clip is on either side of the paper. Add a pom-pom made from the twine and add the twine hanger string. 

For the light switch version this takes a little longer but is worth it. 
First start by covering the covers with your pattern paper. Cut out opening. On a transparency sheet stamp snowflakes. Cut sheet a little bigger that opening size.Glue inside covers with hot glue making sure the stamp side is facing in so there is no chance of smudges. Glue covers back to back. Cover seam with washi tape and twine. Glue on decorations. Poke hole into top hole on covers and thread twine through.