Showing posts with label altered. Show all posts

Thursday, April 28, 2016

Altered Jean Skirt

  Welcome to week two of the month long Thursday fashion series. This week I am going to be sharing on how to bring new life into a well loved jean skirt.

   Here is the skirt I used. It was an old skirt that I have had for years, as you can see  the bottom of it looks faded. For this alteration I just needed some lace fabric and a solid scrap fabric. 
   1. I cut 6 inches off the bottom since I wanted to get rid of the slit in the back.
   2. I serged the edge to stop it from fraying. Next, I fold under edge a half inch and ironed it. That pressed edge is the new bottom hem.
   3. Measure the opening of the bottom, mine was 42" so I cut two pieces of lace fabric 43" x 20" land one piece of solid fabric 43" x 6". I them sewed all the fabric into long tubes, pinned them to the inside of the skirt and stitched them in place.

   4. I am in love with the high low skirts so I ended up laying the skirt out flat with the front matching the front and back matching the back. I then cut the bottom in a curve with the back being long and shorter in the front.
   Since I cut so much of the jean fabric off the skirt I added this fabric to the inside of the skirt for modesty.

   Looking at this photo I can see I still need to do some more cutting on the lace since it is not high enough in the front. 

Thursday, April 21, 2016

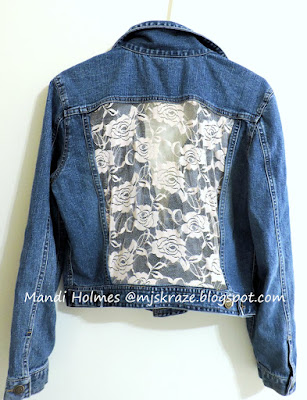
Altered Jean Jacket

   When it comes to the change of seasons I always look through my closet to see if there is anything I want to donate, need to fix or alter. I came across of this jean jacket that I had iron-on a decal years ago but fell off. You can still see part of the design and I also noticed a hole was also appearing. I was just about to get rid of it but then thought of a way to save it. 
  1. cut out the back but leave about an 1" border around the original seams.
   2.  Fold excess fabric to inside of jacket and iron.
3. Pin lace to the inside of jacket and stitch.

   Here is the final product. It is a nice way to freshen up a old jacket. Plus, it is a cheap way to add a "new" trendy item to your wardrobe.
   I love the blush color of this lace fabric I got from Hobby Lobby. For this alteration it cost me under $5.

   If you like this post be sure to come back next Thursday because this part of a Fashion series I will be sharing here every Thursday for the next month or so. 

Sunday, June 30, 2013

Farewells

First off, don't lose your my site when Blogger closes follow me through Bloglovin'. I switch to it a month ago and I am loving it.  look for the link on my right sidebar.
This month has held a lot of goodbyes for me.
The first goodbye went to a online place I called home for over 3 years. It was a club that I got to get to know a lot ladies that I considered my friends. Club CK officially shut down on June 15th. To document my time there I created this page. This I am entering in Frosted Designs Girlfriends blog hop. 
Supplies: pattern paper (Bo Bunny), stickers: (Creating Keepsakes, Bo Bunny and Glitz Designs), Baker's cording (Crafty Steals Basics), gem (Zva Creative), die cuts (?), and button (Webster's Pages)  
The other goodbye's went to design teams. I am going to share my favorite project I created for each team.
The Robin's Nest

Polka Dot Pixies

Sketch~N~Scrap
Even with all these ends there has been new beginnings and opportunities, which I will be able to share with you a few months
I will post the winner to the product challenge Monday. 

Sunday, June 9, 2013

Father's Day Gift

The new challenge at ABAC is all about dear Dad or any male. All you have to do is create a project that is perfect for a guy.
I created a notebook for my dad. He said he like the one I my for his dad at Christmas so I thought he would love this.
Supplies: cardstock (The PAper Studio), pattern paper (Echo Park) washi tape (7 Gypsies),  border punch (EK Success), electronic die cutter and cartridge (Provo Craft), marker (Bic) and stickers (Basic Grey)
 I covered the back of the book to with my dad's favorite color.
Join in on the fun and create something for your guy. You have two weeks to complete the ABAC challenge. 

Friday, April 12, 2013

Daisy Hop with The Robins Nest

   Hi, everyone if you didn't arrive here via Terri Sproul start at the start of the hop and work you way through so you wouldn't miss any of the great projects the design team have made. "Daisy".
   This project might shock some of you since this shadow box is completely different style than I would normally would do.  I started with a shadow box that had the flower pot already on it. It was one I painted before years ago but I out grew the look so I thought it was time to revamp it. 
 Supplies: pattern papers (The Robin's Nest), dew drops (The Robin's Nest), masks (The Crafter's Workshop and I also used a sticker negative), mists ( Heidi Swapp  and I also made some with Smooch paint), inks (Amuse Studio, Close To My Heart, Quick Quotes), stamps (Gel-a-tins), embossing powder (Gel-a-tins)  modeling paste, doily, and pom-pom trim.

Close-ups.
 The pink paper is one of the sorbet papers that is the month's special at The Robin's Nest. 
 I love pom-poms and I thought they would add a nice touch to this.
While the paste was still wet I added embossing powder and heat set and dry it all in one motion. It kinds of make the paste bubble and puff up. 
 I smeared paste all over and rubbed inks and misted the whole thing. 
The flower centers are stamped and the flowers were die cut from the sorbet paper.
 The post I covered in paste, added the dew drops and misted while it was still wet. 
Since you survived this long post how does a "Daisy Prize" package sound to one lucky person. It will include Tear drop, paper, and embellishments. Each design team member is giveaway this. There is going to be 1 Grand Prize winner who will get a $25 certificate to The Robin's Nest.


(Collection closed)
Link tool by inlinkz.com

Saturday, February 2, 2013

Hopping for Valentine's


If you are looking for Scrapbook Challenges click here.
Since Valentine's Day is right around the corner it is perfect timing to do a hop with Valentine's Bakers Twine by Timeless Twine. For the hop I created napkin rings.


Supplies: twine (Timeless Twine), gems (EK Success), washi tape (Doddle Bug Designs),glossy accents, air dry clay and empty Scotch tape spools.


1. This part is optional. Fill the indentations with the clay. Make sure you don't get any on the inside and outside of the ring.
2. Wrap ring with washi tape and twine.
3. Add bow in gem.
Next stop is Melisa
Be sure to comment on all the blogs because one luck commenter will win this

Sunday, January 13, 2013

Things With Wings

This week we are continuing the Things With Wings challenge over at ABAC.
I ended up decorating a small burlap canvas I got for Christmas.


Be sure to stop ABAC and ply with us.